Blogger is very easy to setup with your domain here at GigaLayer. It may take a number of steps that may appear complex, but relax, follow through and in few minutes you’d be up and running on a Blogger account with your custom domain ready for business. Follow these steps:
Getting Blogger Setting:
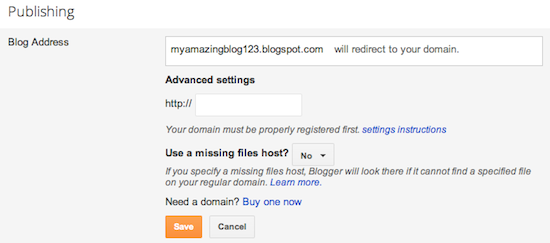
- Log in to your Blogger account and go to Basic under the Settings tab. In the “Publishing” section, click the link to add a custom domain.

- Type the domain name you have purchased including www. or blog. (eg. blog.gigalayer.com or www.gigalayer.com) and “Click Save“
- You should now see an error, and two CNAMEs listed below. Each CNAME is composed of two parts – Name, Label, or Host field and Destination, Target, or Points To field. The first CNAME is the same for everyone, being “www” and Destination “ghs.google.com.” The second CNAME is particular to your blog and your Google Account, and is therefore different for each person.
Configuring GigaLayer Domain:
ATTN: Before you proceed on this, make sure you have notified our Tech Support to enable Cloud DNS for your Domain Name or you can do so from the domain management page in your Core Panel yourself.
- Go to Domains > My Domains –> Manage –> Manage Cloud DNS
- Now it’s time to enter the CNAMEs. Where it says Host Name simply enter “www”, select CNAME as record type and enter “ghs.google.com” as the Address.
- Now enter the second CNAME in the same way.
Fixing Non Www Redirect (Optional):
- You can also enter the following A-Records, which links your naked domain (example.com) to an actual site (www.example.com). If you skip this step, visitors who leave off the “www” will see an error page.
- Where it says Host Name simply enter “your domain name” (without www), select A-RECORD as record type and enter 1 of the IPs below as the Address. Click Save
216.239.32.21
216.239.34.21
216.239.36.21
216.239.38.21Repeat the above proceedure 4 times, untill all the IPs are recorded!
Final Stage of Setup:
- Before you move onto the final step, wait about an 2 hrs for your DNS settings above to propagate. If you attempt this step before the settings propgate, you’d only see an error!
- After your settings have propagated (2hrs+), you need to make sure Blogger knows about your custom domain so that Google can direct readers to your blog. Just head back to Blogger and update the information on your Settings | Basic tab again. Find the area for “Publishing,” and click the link to add a custom domain.

- Enter in the your custom domain in the text box provided again, and click Save.

That’s it! Your blogspot.com address will soon redirect to your new custom domain — be patient, as it might take up to 24 hours for the redirect to start working. If you’re still seeing an error after 24 hours, it means your settings weren’t entered correctly and you should try the process a second time.
You can also contact our Tech Support for further assistance if needed.
